Reading a Map in the Field
Translation details
Model:mistral-medium-2604.Translated text
Section titled “Translated text”a) On a hill with a wide view, a scout patrol gathers. They orient the map—first using a compass, then by matching map symbols—and determine the patrol’s position on it (see below). Next, while examining the surroundings, they identify various terrain features, starting with closer ones and then moving to more distant ones, and locate their corresponding symbols on the map; then they reverse the process: they find a feature drawn on the map and locate it in the terrain.
In this way, they not only learn a series of new symbols but, having the ability to calculate any distance using the map’s scale, they estimate the distance of terrain features by eye and verify their estimate using the map. Thus, the study of map reading is combined with practice in estimating distances. Knowing the distance, one can also calculate the marching time to a given point.
After completing the exercise, the observation point should be changed—that is, move to another hill and from there look toward the former position, i.e., at the same previously observed area, but from the opposite side. How differently the same area will appear to our eyes!
Using a Map in the Field
Section titled “Using a Map in the Field”To use a map in the field, it must first be «oriented», i.e., positioned so that its edges correctly align with the cardinal directions, which can be done by marking the geographic meridian (N-S). In an oriented map, the top edge faces north, the bottom south, the left west, and the right east. All lines drawn on the map will then be parallel to their corresponding lines in the terrain, and a line connecting one’s position on the map to the symbol of a terrain feature, when extended, will fall precisely on that feature in the terrain (Fig. 5).
Next, one must mark one’s own position on the map, i.e., the point in the terrain where one is currently located.
-
Orienting the Map: a) With a Compass. Place the compass on the map so that the N-S (N-S) line aligns with or is parallel to the map’s side edge, with the letter N (N) facing the top of the map. Then rotate the map along with the compass (without changing the compass’s position) until the north end of the needle (black) aligns with the N (N) on the compass. Finally, account for the «declination» (p. 43), i.e., rotate the map further to the right (east) by the angle corresponding to the magnetic declination of the area. (Since the declination in Polish lands is small, omitting it will not be a major error). The map is then oriented (Fig. 5).
b) With a Watch, etc. In the absence of a compass, determine the N-S direction as described on p. 42 and align the map accordingly. At night, the North Star can be used.
c) By Map Symbols. If there are several prominent terrain features in the area that are marked on the map, orient the map by rotating it so that the directions of the lines connecting your position to the corresponding symbols on the map align with the actual directions in the terrain (as in Fig. 5).
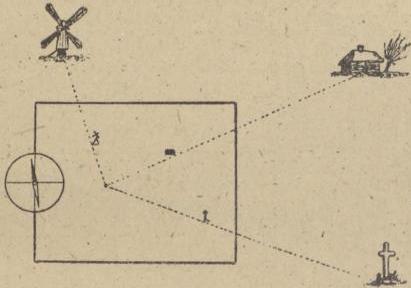
Fig. 5.
Often, this can be done by aligning the map with the direction of a road, railway, etc.—simply position the map so that a line on it aligns with (or is parallel to) a line in the terrain (Fig. 6).
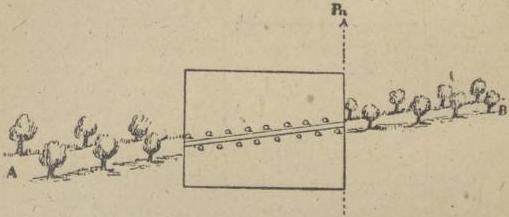
Fig. 6.
Sometimes, in the absence of prominent terrain features or clear lines, the map can be oriented by comparing the depiction of the terrain’s relief on it (contour lines, hatching) with the shapes of the surrounding elevations, though this requires greater skill.
-
Marking one’s position on the map usually only involves accurately identifying it (if necessary), as one does not move blindly with a map in hand, and a scout should always know approximately where they are.
a) By Pacing. If you are on a road marked on the map, find a prominent feature on that road in the terrain (also marked on the map) and measure its distance from your position in paces (sometimes an estimate by eye is sufficient). Convert the measured distance to the map’s scale, then measure that distance from the feature’s symbol on the map toward your position; the point you find on the map is your location. (To avoid mistakes, it is better to orient the map first).
Example: A prominent feature on the road you are traveling is a road sign. It is 320 paces (240 m) away from you and is marked on the map. Since the map has a scale of 1:100,000, 240 m corresponds to 24/100 cm, or about 2½ mm. Orient the map and determine that your position on the road is 2½ mm from the road sign symbol.
b) By Resection (Intersection). If there is no prominent reference feature on the road (as in a), but there is a church, windmill, etc., nearby (also marked on the map), orient the map and align a ruler through the symbol on the map toward the corresponding feature in the terrain. Your position is at the intersection of this line with the road line (Fig. 7).
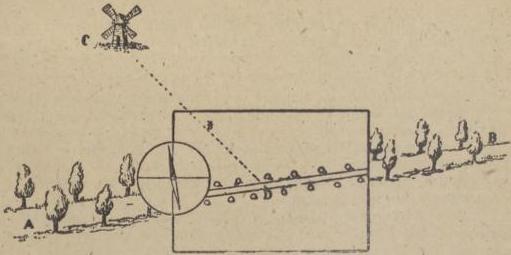
Fig. 7.
c) By Back Resection. If you are in an area where there is no road marked on the map (as in a and b), you must aim at least two directions by sighting prominent terrain features and drawing lines from their symbols on the map back toward your position; their intersection on the map will correspond to your position in the terrain. Search for several reference features in the surrounding terrain, sight them one by one through their corresponding symbols on the map, and draw lines backward from those symbols with a pencil; their intersection on the map will be the point corresponding to your position in the terrain. You can first orient the map, which will make the task easier, but the described method simultaneously orients the map.
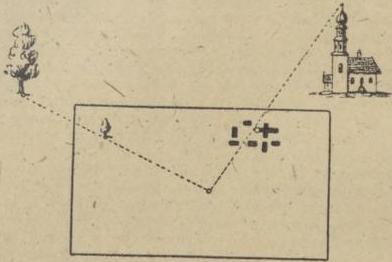
Fig. 8.
If you perform back resection from three terrain features (a more precise method) that form a triangle in the terrain, with your position inside it, the sighting lines to these points may not intersect at a single point (as in Fig. 9), and a small triangle, called the error triangle, will form on the map. Your position will be easier to locate within this triangle.
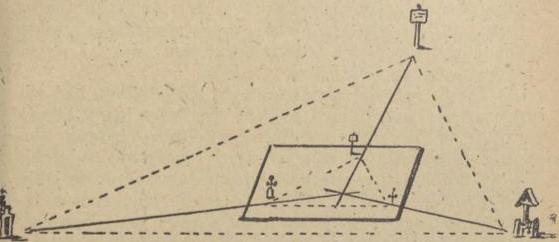
Fig. 9.
As can be seen from the above descriptions, locating one’s position on the map is done in a similar manner to orienting the map.
b) On another day, the patrol goes to a place where it is not as easy to mark their position on the map. The exercise is similar to the previous one but begins with marking the patrol’s position. Sometimes they do this with a compass to orient the map, other times without one—sometimes knowing the road they are on, other times not even knowing the line along which the patrol is moving, etc.—in short, creating various conditions for the patrol, some easier, some more difficult, to locate their position. Then they describe the visible terrain, identifying its most important features—rivers with crossings, vegetation, communication lines, etc.—and compare what they see with the map.
c) From another observation point, the patrol locates in the terrain a feature or point indicated on the map, or vice versa, locates on the map a point indicated in the terrain. (In both cases, the map must first be oriented and one’s position found on it. Then, in the first case, determine the direction of the sought feature by connecting your position on the map with the feature’s symbol—the extension of this line will lead to the feature in the terrain. In the second case, align through your position on the map toward the feature in the terrain—the symbol of that feature on the map will lie on this line).
The patrol also calculates, based on the map, the difference in elevation between a point indicated in the terrain and their own position. (After orienting the map and determining both positions, read the absolute elevations of your position and the indicated point, then calculate the difference).
They also determine, based on the map, what should be visible from the observation point and verify this by observing the terrain, etc.—in short, in the field, they repeat and expand upon the map-reading exercises previously conducted indoors.
d) This kind of terrain insight, i.e., comparing the map with the surroundings, is practiced by the patrol during a march—first in familiar terrain, then in unknown, obscured, or mountainous areas. The route is then traveled in segments from one observation point (a point with a wide view in all directions) to another. At the end of each segment, the map is oriented, the position is marked by comparing it with the surroundings, and a glance is cast at the next segment of the route.
Along the way, attention is paid to prominent features encountered (tower, chimney, interesting terrain formations, etc.), the visible features are constantly compared with the map, and an effort is made to memorize their locations. Often, the already traveled route is reviewed to recognize it on the return march.
Scan source: Polona / National Library of Poland, marked “Public Domain”. View scan — PDF pages 52–58.
Metadata
Section titled “Metadata”- Type: game
- Traits: Not stated in the source
- Source: Zygmunt Wyrobek, Harcerz w polu: zabawy i gry terenowe (1946)
- Printed pages: 46–52 / PDF 52–58
- Digital edition: Digital edition · Source record
- Open the edition at the relevant page: p. 46
- Read the source text: hwp-001